| Utah (Southwest & West) & Arizona (Northwest & West) |
|
Waterhole Canyon & Antelope Canyon – Page, Arizona (near UT/AZ boarder) The Wave (Utah/Arizona) & White Pocket Wire Pass – Buckskin Gulch – (Utah/Arizona) Angel’s Landing - Zion National Park, Utah Hidden Canyon - Zion National Park, Utah Peek-a-boo Gulch and Spooky Slot Canyons – Grand Staircase-Escalante National Monument, Utah Peek-a-boo Trail/Navajo Loop - Bryce Canyon National Park, Utah Side Trips - Capital Reef National Park, Coral Sand Dunes, Zion's Emerald Pools, Narrows, Grand Canyon National Park, Snow Canyon State Park, Little Wildhorse Canyon / Bell Canyon Loop & Goblin Valley State Park Sedona Area & Nearby (Charcoal & Blue Canyons) - Arizona
Waterhole Canyon – Page, Arizona Waterhole Canyon is very much like its famous brother Antelope Canyon, but wilder. Finding the canyon is an adventure by itself. In order to visit Waterhole Canyon, you must obtain a permit from the local chapter of the Navajo Indian Tribe and pay a fee per person and display the permit when parked at the trailhead. The best place to acquire the permit is at the Tribal Parks Office next to the Leche-e Chapter House, about 3 miles south of Page along the Copper Mine Road. The office is a trailer and hides behind the big municipal buildings out front. The permit can be purchased at the office on the day of the visit, or in advance by postal applications. I suggest a visit the day of the visit or the day prior to obtain maps, access points, dos and don’ts and condition of the canyon – these are critical information if you decide to visit the upper (western) section of the canyon were canyoneering gear, hardness and ropes are required for exploration. The ‘parking lot’ for the canyon is situation next to a bridge about 7 miles South of Page off US 89. The Canyon has multiple access and exit points. Not far from the trailhead there were a couple of rows of sandstones nicely lined provide some sort of trail toward the canyon. Later we learned this was just a trail leading to an overlook point so you can look up at the bridge. We somehow climbed down from the overlook and entered the canyon during our 1st visit. If you are short on time, you may want to hike about a quarter of a mile before entering the slots. The best part of the slots are at least a quarter to half a mile away from the trailhead and offers beautiful rock formations in a variety of colors. Water “holes” are evident here. When we emerged from the waterholes, we encountered a dry waterfall that is about 20 feet high. Beyond the fall is the best section of Narrows but both entering and existing the Narrows require some climbing and can be dangerous without adequate knowledge and equipment. i.e., getting stuck with no holds to climb out. Instead of climbing up, you can back track a little and circumvent the dry fall. We were able to explore the Narrows on our 3rd visit by walking backward starting from the powerlines. There are no designated trail here but it's impossible to get lost since the slot has hits highway on one end and powerline on the other... if exploring the Western section of the canyon, the canyon ends with a huge drop into the river. Tips: wear gaiters on cooler days to prevent sand from entering your boots and provide some extra support hoping up and down. We did not see a single person the day we visited the canyon. Obtaining a permit is absolutely necessary since the Tribal Office will know exactly where you are just in case there is an accident. The office can also provide life saving information; on our 1st visit we were turned away because there was flash flood danger the next day. There maybe rattle snakes in this canyon so climbing up/down where you cannot see calls for extra caution. Don’t poke your head up to see what’s on top. I like to bushwhack a bit with my hiking pole before climbing up; a bite on the face can be deadly. Distance: ~2-3 miles roundtrip (east section) Side Trip: Antelope Canyon – this landmark is renowned worldwide and is THE most photographed canyon in the world. It is spectacular in the sense that it is taller than most canyons in the region. However, we found taking photos difficult and the crowds unbearable. Unlike waterhole where it is wild and desolate, you will NEVER be along anywhere near Antelope. We took the photo tour but never had a chance to take a good picture because the waves of crowds. There are some 5-6 tour operations near Antelope… if you don’t mind the crowd this is worth a trip. There are similar canyons near the region but all requires miles of unpaved driving followed by long hikes. I especially liked the open air truck ride!
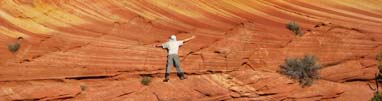
The Wave (Utah/Arizona) Straddle between Utah and Arizona lays The Wave. This is a highly coveted destination for hikers around the world; it took us 2 trips to get there. First trip we arrived at the Bureau of Land Management (BLM) in April of one year and failed to win the lottery for the 10 permits issued daily. Six months later, we obtained the permit over the Internet by having 3 entries at $5.00 each, and won the lottery that way. A total of 20 people are allow to enter the Wave on a daily basis, and the BLM patrols the parking lots for permits on a daily basis, morning and afternoon. To get to the wave, we received a series of color pictures, coordinates and maps from the BLM. A GPS and good map reading skills is a plus. The route is easy to navigate as long as you follow the landmarks on the documents provided by the BLM. Get to the trailhead requires you to drive 8 miles down the House Rock Road (unmarked next to a bridge crossing/hwy bend) off Highway 89; it is between mile mark 25 and 26. The nearest city is Page, AZ. The hike starts from the dry wash; turn left from the trailhead. Just a short walk and we saw a rocky trail on your right – if you take the rocky trail to the top and sees a register station, then you are on the right path, otherwise you are headed to Wire Pass & Buckskin Gulch. From here the trail is a bit sandy until you reach the 1st hill. In order not to spoil the adventure, I'll cut the details short; let’s just say after reaching a couple of saddles you will be able to see a dark crack/gully in the middle of a mountain (12' Oclock straight ahead) – get to the top of the hilltop is your goal. What's waiting for you is a jaw open spectacle unmatched by few places in the world. The hike to the Wave is a treat by itself; the colorful monolith and sandstone are paved in all direction; stop and you will find absolute silence. I could have sat there for days. We kept the hilltops to our right hand side and arrived at the Wave around noon. Overall, this is a moderate hike anyone can accomplish. The last effort to the wave involved a climb up a sandy trail. Just follow the landmarks on the documents provided and you cannot get lost! Tips: wear lightweight Gaiters and carry enough water, regardless if it’s summer or winter. Mark your car’s coordinate. Also heed the warnings from Rangers about the condition of the House Rock Road. We won a walk-in lottery in 2010 but turned around when the road was washed away about 4 miles in; we had a X-Terra for rental but still turned around. Road condition woresens as you approach the trailhead so a support vehicle is desirable. Getting stuck in a ditch 8 miles into the drive can bring a swift end to your vacation. Permit info: https://www.blm.gov/az/paria/obtainpermits.cfm?usearea=CB Distance: 6-7 miles roundtrip Side Trip: White Pocket is the "other Wave" that is less visited but has sceneries rival the original Wave (see pics on our Photo Community website). We do not recommend you go on your own and recommend you google for a tour provider. Depending on the weather, the 'road' to White Pocket may become impassible due to heavy presence of drift sand/deep sand pockets - acutally it's more like 8-9 miles of deep sand pockets. During our last trip, we aired down the tires on the FJ & had two manual bicycle pumps, a shovel & tire repair kits as supporting equip. Was it worth it...? Heck yeah, White Knuckle, yeah! :) Be VERY WELL prepared & let someone know exactly where you are. This is no joke but when we arrived at a local restaurant, the owner asked us which way we drove up to White Pocket, we told him the long way. He smiled "You are lucky, the road via Paw Hole has gotten so bad in the last few day your guys won't be here if you had taken that road..." Yikes. :) Wire Pass – Buckskin Gulch – Utah Arizona Boarder Wire Pass is a short drainage that joins the Buckskin Gulch slot canyon. Many backpackers use the Wire Pass as a passage to enter the Buckskin Gulch. This short hike is highlighted by a section of the narrows followed by the 3 way intersection where the pass joins the Buckskin Gulch. Get to the trailhead requires you to drive 8 miles down the House Rock Road (unmarked next to a bridge crossing/hwy bend) off Highway 89; the turnoff is between mile mark 25 and 26. From the trailhead, we followed the streambed (turn left) and entered narrows in a little over a mile. You can’t get lost as long as you follow the streambed. Due to the low canyon walls, the narrow section offered spectacular photo opportunity when the light is good; the sun illuminated the curved canyon walls and produced a light box effect. This effect was more difficult to achieve in canyons with higher walls. The narrow has a few sections with chock stones blocking the way but there are lots of hand/foot holds so it’s easy to navigate over these obstacles; no equipment is required. Upon emerging from the narrows, we were greeted with a spectacular vista of a 3 way intersection where the pass joins the Buckskin Gulch. We ventured as far as we could on both ends of the Gulch then traced our step back. The water and mud were too much to handle that day. Waterproof booties are necessary if you intent to explore the gulch in longer distance. I found the gulch to the right had better light. The gulch to the left was a bit eerie and carried a lesser friendly vibe. Tips: wear gaiters and wind breaker to stop sand getting into your cloth/shoes/cameras. I remembered raining sand in the narrows. Distance: ~3 miles roundtrip Angel’s Landing - Zion National Park, Utah
The trail starts off at Grotto Trailhead; just follow the signs. The trail is so popular that getting lost is impossible. We started off with a casual stroll along the stream, followed by a long and winding climb, then a distinct zigzag push (a.k.a. Walter’s Wiggles) up a valley, and finally a half mile trail with 800-1200 foot drops on both sides. For much of this trail was a long and steady trudge uphill, there were still some excellent views/panorama around each corner. Once we have reached the top of the Wiggles, we were welcomed by a lot of hikers. There were so many hikers that there wasn't even room to take pictures without having someone else in the frame. In all, half the people gathered around the base of the last climb to admire the views, and the other half grabbed the chains and pulled themselves to the top. At certain sections, we opted to take extra precautions and used some climbing gear to protect ourselves when taking pictures. It's not because we are afraid of heights but afraid of someone pushes us accidentally, and that's how the people perished up here as told by the Rangers. During the climb to the top, we would clip into the chains as needed, to let others past by, to balance ourselves by the edge for a photo op, etc. However, we end up using the carabineers only a couple of times... Overall the climb was easy with the trail well maintained. The chains have been added since the accidents and provide a lot of grip and security. It is recommended that you do not rely on the chains to pull yourself up, but use your legs. The chains are there to provide extra support or a crutch. We saw multiples sections of chains broken/failed, and you won’t want to trust the entire weight of your body on the chain! I am sure you can relate if you have climbed technically. At the summit, there is a 360 degree panorama of the valleys below.
Hidden Canyon - Zion National Park (Utah) Hidden Canyon is a relatively easy hike that offers a little of everything Zion has to offer... a view of the Zion Valley and a little bit of canyoneering. It’s a good prep climb or a wind down climb for Angel’s Landing. The short 2 miles hike can be extended depending your ability and time restrain. On the day we hiked the trail, we were blessed by a snow shower that added some color to the red rocks. The trailhead is at the Weeping Rock parking lot. We started off with a long winding switchback making its way up the mountain. We were able to see the parking lot the whole time even after some 800 feet of climbing. As we slowly skirted around the mountain and made our way to the backside of the mountain, we came across a section with some steep drop-offs. This section is aided by some chains so there is no need to worry unless you are fearful of heights. We arrived at the trail’s ‘endpoint’ quickly where a sign indicates the beginning of the Hidden Canyon. Since we have been prepared for some canyoneering, we slipped on some ultra lightweight harness and took out the ropes. The 1st climb was a relatively easy bouldering on the left side of the canyon; a short climb about 15 feet up. The 2nd climb was relatively easy approach up a dry waterfall from the right side of the fall. We didn’t have to use the ropes going up the canyon but had to use it as a precaution coming down. The climbs became more precarious as we progressed deeper into the canyons. We turned around when the snow flakes got bigger; the climb down was only possible with the help from ropes under these wet conditions. Mary belayed me and I spotted her. I have to admit Mary stayed infront and set the ropes; she may look skinny but is a stronger climber. Tips: Bring adequate water, food and clothing. We brought rain gear and use it about half way up the mountain. The weather changes quickly in the mountains/canyon. Know your limit in approaching the canyon, even a small fall can be deadly. There are sections in the canyon where a small slip can easily break a leg. Come prepared if you plan to explore the canyon. Length (round-trip): ~3 miles Peek-a-boo Gulch and Spooky Slot Canyons – Grand Staircase-Escalante National Monument, Utah As one of our favorite Slot Canyons, and we have already visited this place two times. Peek-a-boo offer spectacular photo opportunities and a taste of canyoneering without special equipment. Spooky is just exciting and lies about a quarter of a mile beyond the end of Peek-a-boo, and offers more challenge. This day hike combo will exhilarate you. The slots are located in the Hole-in-the-Rock Area. From the town of Escalante drive east on Hwy. 12 to the Hole-in-the-Rock Road. Head south on the Hole In the Rock Road for about 26 miles to a turnoff for the Dry Fork Trailhead. Drive a high clearance vehicle if possible or drive slow during the last section of the drive. Peek-A-Boo runs for about half a mile to a sandy wash. It is a hanging canyon with a difficult to identify entrance perched about 20 feet above the canyon floor. To find the entrance, we started off with a hike from the Dry Fork Trailhead down into the Dry Fork Canyon. The trail followed a side canyon down a cliff face to our right. When we emerged from the side canyon into the wide, sandy bottom of Dry Fork, we look across (on your left) to find Peak-A-Boo. It was just a small crack in the wall. A word of caution, there will be a side canyon to your left before approaching the Peek-a-boo entrance, ignore that entrance. If in doubt, look for backpacks and people hanging around the bottom of the entrance. Hand and foot holes have been ‘carved’ into the wall to allow an easy climb into the entrance. Having the most experienced hiker get to the top and toss down a rope is another way to get to the top. Incredible slots, arches and one peak-a-boo after another are dotted along the next quarter mile stretch. Once we’ve emerged from the Peak-A-Boo, bear right and following a sandy path toward Spooky Gulch. The Spooky Gulch was next to the bottom of a Dry Fork. We were glad to be wearing gaiters since the downward dash to the bottom of the dry fork brought ankle deep sand. The opening of the spooky looked benign, it was fairly wide and is dotted with large boulders. But as we advanced further, we came to a point where we couldn’t find a way down into the slot floor. At one point I almost thought we had picked the wrong slot until I heard voices coming underneath us… it was a group of kids trying to climb up. We found an opening to climb down on the left side of the canyon. I slid down the chock stone and created a hole on the back of my pants, and some bruises on my elbow. Oh well, it’s too late to turn back I told myself. The bottom of the canyon floor was dark and quickly funnels into a tight slot. My wife and I are both slender built so there were no problem squeezing through the slots. Toward the end of the slot there was a place where you have to squeeze through crouching down (or on fours). Don’t give up here since the exit is only a short stroll (wait, I mean short squeeze) away. If you are a large person, do not hike this canyon. The week before our visit, someone got stuck and had to be rescued. After completing spooky, we headed toward the left, then took the 1st right and followed the rocky wash to complete the loop. On our way back, we past the entrance to Spooky on our right hand side. You may elect to hike spooky 1st but it’s much more difficult. However, it can be accomplished if you have proper climbing skills and/or equipment. Tips: wear gloves, gaiters and bring a section of rope. Hike during cooler climate. Learn about the weather condition since a flash flood in these canyons can be deadly. We used a GPS to mark key waypoints and it helped us to navigate the loop. Length (round-trip): ~3 mi Willis Creek Slot Canyon - Skutumpah Terrace section of the Grand Staircase-Escalante National Monument (Utah) Getting to this canyon off the main highway involves quite a bit of off the pavement drive - approx. 40 miles one way. From Mount Carmel Junction, we followed 89 north headed toward Glendale. From mid town Glendale, we made a right turn on 300 North (a.k.a. Bench Road.) The road becomes Glendale Bench Road (road #600). We traveled for about 15 miles to a marked junction in the road & took the Skutumpah Road, travelled 14 miles to arrive at the Lick Wash Trailhead. From the Lick Wash Trailhead, we continue down the Skutumpah Road an additional 11.8 miles to arrive at the Willis Creek Slot Canyon parking lot. The trailhead is directly across from the parking lot (or you can follow the stream bed). I believe the stream actually runs into the canyon floor so if the stream is rushing with water… it’s a good idea to turn around at this point. We were the only car in the parking lot. Judging from the names/dates on the register box, there have only been two other people visited the canyon in the last few days. As we entered the canyon, the walls were fairly low. But the walls grew higher as we ventured deeper into the canyon. Having ice and snow covered on the deeper sections of the canyon floor is quite a sight considering the day time temperate is around 70. We encountered narrow and wide sections during the hike. To us the best section of the hike is when the wall rise abruptly to create a bone chilling oval shaped (giant) slot. You’ll know when you get there when you start to have goose bumps. The dark, menacing sculptured slick rock walls towered above us; the walls were so high that the sky was nothing but a slender slot above our heads. I told Mary I think we have arrived at the Batman’ Cave. We did not advance too much further after this awesome experience; I had never felt this vulnerable inside a canyon and was totally awed at the power of water creating such incredible curves ~150 feet up the canyon walls. We back tracked at this point and existed at the steam crossing by the road. Tips: Water proof shoes are recommended if the stream is running. The hike is an easy stroll so no special equipment is needed. Hike when it’s bright/sunny or early during the day, otherwise the mid/later sections of the hike becomes cold and creepy. Due to the length of the drive on the dirt road (about 40 miles one way), ensure your vehicle can handle extreme conditions if wet conditions are expected. Length (round-trip): ~4 miles Peek-a-boo Trail/Navajo Loop - Bryce Canyon National Park, Utah Hoodoos are the name of the game at Bryce Canyon, and much like Grand Canyon, the best part of the park is when you descend, into the hoodoos. We arrived at the park around 6pm and were greeted with one of the most spectacular sunset we have ever seen. As our fingers and toes starts to loose their sensations, we retreated to the hotel near Hotel’s entrance. On day 2, we spent the day on a figure 8 loop hike through the hoodoos. The trail combination we took starts off at Sunset Point, followed by a descent down the Navajo Loop Trail, and then returning back to Sunset Point. On the maps, it looked like a figure 8. The highlight of the 1st section of the hike was a switchback descends down the valley. The sun bounced its rays off the top of the rims and shined down the valley, this created a surrealistic flood of orange glow cascading all the way down to the valley floor. This section was slippery and steep at certain section. We saw a few people wearing sandals retreated about half way down; obviously these folks are wise to turn back to avoid possible injuries. We were disappointed by the news that the famous WALL STREET has been permanently closed due to a collapse. Unflustered, we circled around the WALL STREET. After a short hike in the open, we entered a trailhead for the junction to the Peek-a-boo Trail. This was the second and the main attraction of the hike – we took the trail on the right and existed on the left; completing the loop. As we climbed, we noticed the changing landscapes - from pure hoodoos to pine trees, junipers and even patches of snow. After going up and down the trail for nearly two hours, we emerged into a land that resembled the surface of moon. Throughout the trail, we dwarfed under piles of sculptured spires and colorful pinnacles. We love summits but we also welcomed this unique down in the valley experience. Tips: no special equipment is needed; wear proper footwear and bring water. Hike in cooler climate if possible. We hiked in early April and carried Yaktrak just in case. Getting to the park is half the battle and requires a long drive regardless where you live, so be prepared to add a day for travel time. Distance: ~5 - 7 miles roundtrip (depending on your complete the loop), Peek-a-boo trail forms its own circle. 1) Captial Reef National Park is outside of Torrrey, Utah. it is a hidden gem full of canyons and cliffs. We only spent half a day exploring two canyon off the Scenic Drive (south of the Visitor Center); we have vowed to come back again and spend a couple of days to explore this amazing landscape. 2) Coral Pink Sand Dune State Park is a short drive from the eastern entrance to Zion. The park is 12 miles of U.S. Hwy 89 near Kanab. Yes, the sand is really Pink! 3) Zion's Emerald Pool Waterfall hike offers a short & relaxing hike; a good place for photography during changing colors. 4) Zion's well-known Narrows offers an adenturous day hike (up-stream); visit the Visitor's Center for equipment rental and weather info. 5) The ubiquitous Grand Canyon; stay next to the RIM & visit all the points (including the Yaki Point); take a mule ride down to the canyon floor to a point with a grand overlook of the Colorado river. Do not take the mule ride if you are afraid of the heights and mind sore legs.6) Snow Canyon State Park near St George, Utah is more of a National Park than a State Park (IMO). There are sand dunes, hidden canyons and red rock formations like the major hikes described above, just on a smaller scale. It's a great stop by on your way back to the airport. (spend at least half a day). 7) The Little Wild Horse Canyon/Bell Canyon loop hike is an 8 miles round trip but will take you about 5-6 hrs if frequent stops are made for photography... or just scramble up & down the boulders. Situated near Goblin Valley State Park, this is considered as one of the best slots in the area. We found the beginning sections when going counter clockwise had the best scenery. Google for Goblin Valley State Park for direction, the turn-off to Little Wild Horse Canyon is located about 10-11 miles from HWY 24 and a couple of miles before the Goblin Valley State Park fee station. From the turn-off, it's ~5+ miles dirt road to the trailhead (on the right side). A word of caution, this slot is EXTREMELY dangerous if precipitation at or near the area is expected.
There are numerous trails in the Sedona Area, the two most memorable trails we hiked would be the Devil’s Bridge & the West Fork. Devil’s Bridge is a short 2 mile Round Trip hike with little elevation gain. One way in, one way out. We can’t really bring ourselves to say the trail and the arch was exciting (when compared to Utah’s bigger arches) but the most memorial part of the trip was the dirt path leading up to the trailhead. With a 2WD CUV rental it was a little bit challenging. We end up parking the vehicle a few hundred feet shy of the actual trailhead to spare the oil pan. The dirt road would be more forgiving if you have a high clearance (~8.4 inch or greater) 4WD vehicle. Getting to the trailhead, from the intersection of Route 89A & 179, drive towards Cottonwood for 3 miles, and then turn right onto Dry Creek Road. Stay on Dry Creek for 3 miles and turn right on FR 152 for 1.3 miles to the trailhead. As a local favorite, the West Fork is one of the most photographed locations in Sedona. Located about 10 miles+ up Highway 89A from the "Y" (Rt 89A & 179 intersection), the trailhead is located in a well maintained parking lot with a toll booth. This wide open canyon hike is full of stream crossings, reflection pools, shadows and contrasts. The vegetation makes it a challenging place to take pictures with too many subjects appear before the camera lens. When we arrived at a section called ‘subway’ with a semi circular canyon wall formation, we weren’t able to capture the scope of the subject because the mid-day sun had already penetrated the canyon walls, made light difficult to manipulate. We were stopped by the high water at the ‘subway’ but you can continue on this trail to as far as Flagstaff. Overall, this was a tranquil, picturesque hike along the canyon floor. Challenge Level: Easy Side Trips: The other canyon is much more remote and requires a long drive on a dirt road on local Hopi land, but permit is not required. The area consists of rock formations similar to Utah’s Goblin Valley state park. One exception is that between the rock formations, the dirt platforms are extremely fragile and I’ve step through the dirt with one foot while climbing up a formation. If it wasn’t for the TaiChi reflex (for which I have contributed to) to shift my weight, I would’ve dropped into an abysses of 3 story height sinkhole between slaps of rocks. Have fun but be very careful.
|